Section 1 Content
Unit 1 — Buffers and Physiological Solutions
1. Physiological Solutions
Biological systems are highly sensitive to changes in their surrounding chemical environment. Cells require appropriate concentrations of ions, nutrients, water and other substances to maintain membrane integrity, enzyme activity, osmotic balance and normal metabolism. For this reason, physiological solutions are widely used in biological and biochemical laboratories.
The exact composition of a physiological solution depends on the biological system being studied. A solution used for maintaining isolated cells may differ considerably from one used for preserving an isolated organ or performing an enzyme experiment.
Important characteristics
- Appropriate osmotic pressure.
- Suitable pH.
- Appropriate ionic composition.
- Maintenance of cellular integrity.
- Compatibility with biological molecules.
- Minimal interference with biochemical reactions.
Examples
- Normal saline.
- Phosphate-buffered saline (PBS).
- Ringer's solution.
- Ringer-Locke solution.
- Hank's balanced salt solution.
2. Buffers and Buffering Action
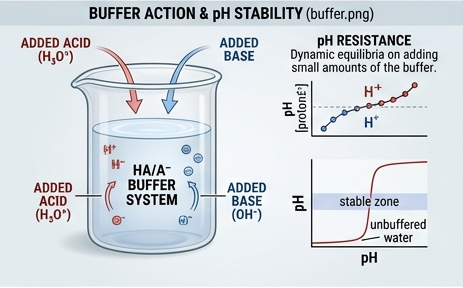
Buffer solutions are extremely important in biological systems because most biochemical reactions are strongly influenced by pH. Enzymes, proteins, nucleic acids and cellular structures generally function within particular pH ranges.
A typical buffer consists of a weak acid and its conjugate base, or a weak base and its conjugate acid. The two components work together to absorb added hydrogen ions or hydroxide ions.
General mechanism of an acidic buffer
Consider a weak acid represented by HA and its conjugate base A⁻.
When acid is added, the additional H⁺ is consumed largely by A⁻ to form HA. When a small amount of base is added, OH⁻ reacts with H⁺ and the equilibrium shifts so that more HA dissociates.
Components of a buffer
- Weak acid.
- Conjugate base or salt of the weak acid.
- Water or another suitable solvent.
Factors affecting buffer action
- pKa of the weak acid.
- Ratio of conjugate base to weak acid.
- Total concentration of buffer components.
- Temperature.
- Volume of the solution.
- Amount of acid or base added.
- Presence of other chemical substances.
3. Henderson–Hasselbalch Equation
The Henderson–Hasselbalch equation is one of the most important equations used for calculating the pH of a buffer containing a weak acid and its conjugate base.
Where:
- pH = hydrogen ion activity expressed approximately as pH in dilute aqueous solutions.
- pKa = negative logarithm of the acid dissociation constant.
- [A⁻] = concentration of conjugate base.
- [HA] = concentration of weak acid.
Biological significance
The equation helps researchers prepare buffers with a desired pH. It is particularly useful when studying enzymes because enzyme activity often depends strongly on maintaining a specific pH.
Special case
When the concentrations of weak acid and conjugate base are equal:
Therefore:
pH = pKa
4. Buffer Calculations and Numerical Problems
Example 1 — Calculating pH
Suppose a buffer contains a weak acid with pKa = 4.76. The concentration of conjugate base is 0.20 M and the concentration of weak acid is 0.10 M.
pH = 4.76 + log(0.20/0.10)
pH = 4.76 + log(2)
Since log₁₀(2) is approximately 0.301:
Example 2 — Equal concentrations
If a buffer contains equal concentrations of a weak acid and its conjugate base and the pKa is 6.80:
Example 3 — Finding the ratio
If pH and pKa are known, the equation can be rearranged to calculate the required ratio of conjugate base to weak acid.
5. Buffer Capacity
Buffer capacity depends mainly on the total concentration of buffer components and their relative proportions. A concentrated buffer generally has a greater capacity to absorb added acid or base than a dilute buffer of the same composition.
Factors affecting buffer capacity
- Total concentration of buffer.
- Ratio of weak acid to conjugate base.
- pH relative to pKa.
- Temperature.
- Volume of buffer.
Buffer capacity is greatest when the concentrations of the weak acid and conjugate base are approximately equal.
6. Important Biological Buffers
| Buffer | Major Components | Major Biological/Laboratory Importance |
|---|---|---|
| Bicarbonate buffer | Carbonic acid / bicarbonate | Major extracellular physiological buffer; important in blood pH regulation. |
| Phosphate buffer | H₂PO₄⁻ / HPO₄²⁻ | Important intracellular and laboratory buffer. |
| Protein buffer | Ionizable groups of proteins | Contributes to acid-base regulation in biological systems. |
| Tris buffer | Tris base / protonated Tris | Common biochemical and molecular biology buffer. |
| Acetate buffer | Acetic acid / acetate | Useful for acidic laboratory conditions. |
7. Preparation of Buffers
Preparation of a buffer requires careful selection of the buffering system, calculation of component quantities, preparation of stock solutions where appropriate, adjustment of pH and accurate final-volume adjustment.
General steps
- Select a buffer system with a pKa close to the desired pH.
- Determine the required final concentration.
- Calculate the quantities of the components.
- Dissolve the components in an appropriate amount of water.
- Measure the pH using a calibrated pH meter.
- Adjust the pH carefully if required.
- Transfer to a volumetric container and make up to final volume.
- Label the solution with name, concentration, pH and date.
- Store under appropriate conditions.
8. Importance of Buffers in Biological Research
Buffers are used throughout biological research because changes in pH can alter protein structure, enzyme activity, nucleic-acid stability, membrane properties and chemical reaction rates.
- Maintaining enzyme assay conditions.
- Protein extraction and purification.
- Electrophoresis.
- Chromatographic separation.
- DNA and RNA manipulation.
- Cell culture.
- Immunological assays.
- Preparation of physiological solutions.
- Stabilization of biological molecules.
9. Model 10-Mark Answer: Explain Buffers and Their Importance in Biological Research
A buffer is a solution that resists a significant change in pH when relatively small amounts of acid or base are introduced. Buffer systems are fundamental to biological research because biochemical reactions are highly dependent on pH.
A typical buffer contains a weak acid and its conjugate base. The weak acid can donate hydrogen ions, whereas the conjugate base can accept hydrogen ions. Therefore, when acid is added, the conjugate base removes much of the additional hydrogen ion. When base is added, the weak acid reacts with hydroxide through proton-transfer reactions. Consequently, the pH changes much less than it would in an unbuffered solution.
The pH of a weak-acid buffer can be estimated using the Henderson–Hasselbalch equation:
Buffer capacity depends on the total concentration of buffer components and is greatest near the pKa when the concentrations of the weak acid and conjugate base are comparable.
Important biological buffers include the bicarbonate, phosphate and protein buffer systems. In laboratory investigations, Tris and phosphate buffers are frequently used because they provide suitable pH ranges for many biochemical procedures.
Buffers are important in enzyme assays, protein purification, electrophoresis, chromatography, cell culture, nucleic-acid analysis and immunological investigations. Maintaining a stable pH prevents unwanted changes in protein structure and enzyme activity and improves reproducibility of experimental results.
Thus, buffers are essential tools for maintaining controlled chemical conditions in both physiological systems and laboratory investigations.
Unit 2 — General Principles and Approaches of Biochemical Investigations
1. Introduction to Biochemical Investigation
Biochemical investigation involves the study, detection, characterization, separation and measurement of biological molecules and biochemical processes. Proteins, nucleic acids, carbohydrates, lipids, metabolites, enzymes and other cellular components may be investigated using a combination of biochemical and instrumental techniques.
A successful biochemical investigation generally involves a sequence of steps beginning with selection and collection of an appropriate biological material, followed by sample preparation, cell disruption when necessary, extraction, purification, separation and analytical identification.
General workflow
The exact workflow depends on the molecule being studied. A soluble enzyme, membrane protein, DNA molecule and small metabolite require different extraction and purification strategies.
2. Disruption of Cells
Many biological molecules of interest are located inside cells. Before these molecules can be purified, the cellular membrane and, in some organisms, additional structural barriers must be disrupted.
Objectives of cell disruption
- Release intracellular proteins.
- Release nucleic acids.
- Recover enzymes and metabolites.
- Isolate organelles.
- Obtain cell-free extracts.
Important considerations
- Type of organism.
- Cell-wall composition.
- Location of target molecule.
- Stability of target molecule.
- Temperature.
- Shear sensitivity.
- Scale of the experiment.
3. Chemical Methods of Cell Disruption
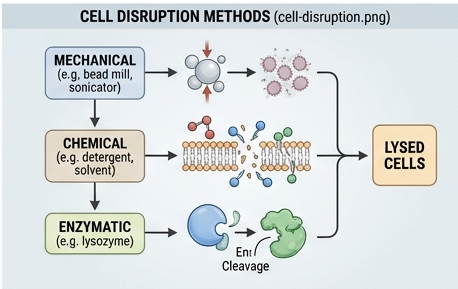
Chemical methods use chemical agents to weaken or disrupt cellular membranes and structures. They can be useful when gentle treatment is required, although the chemical used must not interfere with the target molecule or downstream analysis.
Detergents
Detergents interact with lipid membranes and can disrupt membrane structure. They are particularly important in the extraction of membrane-associated proteins.
Examples include ionic detergents such as SDS and non-ionic detergents such as Triton-type detergents. The choice depends on whether preservation of protein structure and activity is required.
Osmotic lysis
Cells can be exposed to an environment with an appropriate osmotic difference, causing water movement across the membrane and potentially leading to cell swelling and lysis. Osmotic methods are especially useful for some susceptible cells or specific subcellular preparations.
Organic solvents
Certain solvents can disrupt membranes or selectively extract cellular components. However, they may denature proteins and therefore require careful selection.
Advantages
- Can be relatively simple.
- Useful for membrane disruption.
- May be scalable.
Limitations
- Chemicals may denature proteins.
- Some detergents interfere with downstream assays.
- Removal of the disrupting agent may be necessary.
4. Enzymatic Digestion
Enzymatic digestion uses specific enzymes to degrade structural components surrounding or supporting cells. This approach is particularly useful when cell-wall components need to be selectively weakened.
Examples
- Lysozyme for susceptible bacterial cell walls.
- Cellulase for plant cell-wall components.
- Pectinase for pectin-rich plant materials.
- Other specialized enzymes depending on biological material.
Factors affecting enzymatic digestion
- Enzyme concentration.
- Substrate concentration.
- pH.
- Temperature.
- Incubation time.
- Presence of inhibitors.
Enzymatic treatment is often combined with mechanical methods to improve disruption efficiency while limiting excessive mechanical damage.
5. Mechanical Methods of Cell Disruption
Mechanical disruption uses physical forces to break cells. It is widely used because many biological materials can be processed without introducing large quantities of chemical reagents.
Homogenization
Homogenizers generate shear and mechanical forces that disrupt cells and produce a relatively uniform suspension.
Grinding
Tissue or frozen biological material can be mechanically ground to break cellular structures. This approach is useful for some plant and tissue samples.
Ultrasonication
Ultrasonic energy generates cavitation and mechanical forces capable of disrupting cells. Sonication is commonly used for microbial cells and laboratory-scale preparations.
French press
A French press disrupts cells by forcing a cell suspension through a narrow opening under high pressure.
Bead beating
Small beads are rapidly agitated with the sample, causing collisions and mechanical forces that break cells.
Freeze–thaw disruption
Repeated freezing and thawing can produce physical damage to cells through ice-crystal formation and changes in cellular structure.
| Method | Major Principle | Typical Advantage | Major Limitation |
|---|---|---|---|
| Homogenization | Mechanical shear | Useful for tissues and cell suspensions | Heat and shear may damage sensitive molecules |
| Sonication | Ultrasonic cavitation | Rapid laboratory-scale disruption | Heat generation and possible protein damage |
| French press | High-pressure mechanical disruption | Effective for microbial cells | Specialized equipment required |
| Bead beating | Bead-cell collisions | Effective for difficult-to-disrupt cells | Can generate heat and debris |
6. Extraction Buffers
An extraction buffer is a carefully formulated solution used to maintain the stability and solubility of the target molecule during cell disruption and extraction.
Important components
- Buffering agent to maintain pH.
- Salts to control ionic strength.
- Detergents when membrane disruption is required.
- Reducing agents when protection from oxidation is necessary.
- Chelating agents when metal-ion-dependent degradation or reactions must be controlled.
- Protease inhibitors when protein degradation is a concern.
The extraction buffer must be selected according to the target molecule and the subsequent purification method. A buffer that preserves one enzyme may be inappropriate for another protein or downstream analytical technique.
7. Selection of Protein Source
Selection of an appropriate protein source is a critical early step in protein investigation. The researcher should select a biological material that contains the target protein in sufficient quantity and in a form that can be recovered efficiently.
Factors to consider
- Abundance of target protein.
- Location of protein within the cell.
- Presence of interfering substances.
- Availability of biological material.
- Protein stability.
- Ease of extraction.
- Cost of sample collection and processing.
Possible protein sources
- Animal tissues.
- Plant tissues.
- Bacterial cultures.
- Yeast and fungi.
- Cell cultures.
- Recombinant expression systems.
8. Protein Extraction
Protein extraction is the process of releasing proteins from biological material into a suitable liquid phase while maintaining their desired structural and functional characteristics.
General procedure
- Select and prepare biological material.
- Add suitable extraction buffer.
- Disrupt cells or tissue.
- Maintain appropriate temperature and pH.
- Remove insoluble debris.
- Collect the soluble fraction.
- Continue with purification or analytical separation.
Low temperature is often used during protein extraction because many proteins and enzymes are susceptible to degradation or denaturation. Protease inhibitors may also be included when appropriate.
9. Protein Solubilization
Protein solubilization refers to maintaining or converting protein into a dispersed soluble form in an appropriate solvent system. Solubility depends on interactions between the protein surface, water, ions, other molecules and the physicochemical environment.
Factors affecting protein solubility
- pH.
- Ionic strength.
- Temperature.
- Protein concentration.
- Presence of detergents.
- Presence of chaotropic agents.
- Organic solvents.
- Protein structure.
Effect of pH
Protein solubility often reaches a minimum near the isoelectric point because the net electrical charge of the protein approaches zero. Reduced electrostatic repulsion can facilitate protein aggregation and precipitation.
10. Chromatographic Separation of Proteins
Chromatography separates components based on differences in their interactions with stationary and mobile phases. Protein purification commonly uses multiple chromatographic steps because no single separation method is usually sufficient to obtain a highly purified protein.
Important chromatographic approaches
- Ion-exchange chromatography.
- Affinity chromatography.
- Size-exclusion or gel-permeation chromatography.
- Other specialized chromatographic methods.
The choice of chromatography depends on protein charge, size, specific binding properties, hydrophobicity and stability.
11. Electrophoresis of Proteins
Electrophoresis is a separation technique in which charged molecules move through a medium under the influence of an electric field.
Protein electrophoresis can be performed under native conditions, where charge, size and shape influence migration, or under denaturing conditions such as SDS-PAGE, where proteins are largely separated according to molecular size.
Applications
- Assessment of protein purity.
- Molecular-weight estimation.
- Comparison of protein samples.
- Detection of protein expression.
- Analysis of protein subunits.
- Proteomic investigations.
Detailed agarose electrophoresis, PAGE, SDS-PAGE, isoelectric focusing and two-dimensional electrophoresis will be covered extensively in Section 2.
12. Ultracentrifugation of Protein Samples
Ultracentrifugation uses very high centrifugal fields to separate particles or molecules according to their sedimentation behavior. It can be used for protein, macromolecular and subcellular investigations.
Sedimentation depends on several properties including particle size, shape, density and the density and viscosity of the surrounding medium.
Applications in protein research
- Separation of macromolecular complexes.
- Analysis of protein aggregation.
- Study of molecular association.
- Separation of subcellular components.
- Characterization of large biological particles.
13. Model 10-Mark Answer: Describe Methods of Cell Disruption
Cell disruption is an important step in biochemical investigations because many proteins, enzymes, nucleic acids and other biological molecules are located inside cells. The purpose of cell disruption is to break the cellular structures sufficiently to release the desired intracellular component while minimizing degradation or denaturation.
Cell disruption methods can broadly be classified into chemical, enzymatic and mechanical methods.
Chemical methods include the use of detergents, osmotic approaches and selected chemical agents. Detergents are particularly useful for disrupting lipid membranes. However, strong detergents can denature proteins or interfere with subsequent assays.
Enzymatic disruption uses enzymes that degrade specific structural components. For example, lysozyme can be used to weaken susceptible bacterial cell walls, while cellulolytic enzymes can help disrupt plant materials.
Mechanical approaches include homogenization, grinding, ultrasonication, French press treatment, bead beating and freeze–thaw cycles. These methods apply physical forces to damage the cell envelope and release intracellular material.
The method selected depends on the organism, cell-wall composition, target molecule, sample volume, required scale and sensitivity of the target molecule. Temperature control is particularly important because mechanical disruption may generate heat and promote protein denaturation or enzymatic degradation.
Thus, effective cell disruption requires a balance between maximum release of the target molecule and minimum damage to its structure and activity.
14. Model 10-Mark Answer: Explain Protein Extraction and Solubilization
Protein extraction is the process of recovering proteins from a biological source into a suitable solution. The process begins with selection of an appropriate source and proceeds through cell disruption, extraction, clarification and subsequent purification.
The extraction buffer is selected to maintain a suitable pH and ionic environment. Depending on the protein, detergents, reducing agents, chelating agents or protease inhibitors may be included.
After cell disruption, the homogenate contains soluble proteins, membrane fragments, organelles, nucleic acids, insoluble material and other cellular components. Centrifugation can be used to remove much of the insoluble material and obtain a soluble extract.
Protein solubility is affected by pH, ionic strength, temperature, protein concentration, detergents and other chemical conditions. Protein solubility frequently becomes relatively low near the isoelectric point.
Once extracted, the target protein can be purified using techniques such as precipitation, dialysis, ion-exchange chromatography, affinity chromatography, size-exclusion chromatography and electrophoretic methods.
Proper control of pH, temperature and chemical environment is essential because proteins may denature, aggregate or undergo proteolytic degradation during extraction.
Unit 3 — Microscopy
1. Phase-Contrast Microscopy
Many biological cells are nearly transparent under ordinary bright-field illumination. Their structures alter the phase of transmitted light more than they alter its intensity. Phase-contrast microscopy makes these phase differences visible as variations in brightness.
Principle
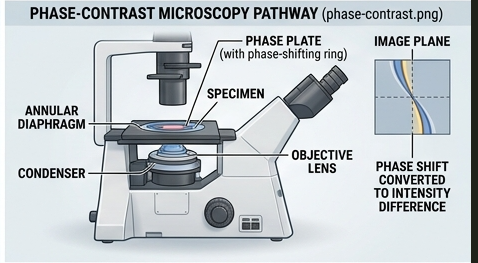
Light passing through different parts of a transparent specimen experiences different optical path lengths. These differences produce phase shifts. The phase-contrast system uses an annular diaphragm and a phase plate to alter the relationship between direct and diffracted light, converting phase differences into intensity differences that can be observed.
Major components
- Light source.
- Condenser with annular diaphragm.
- Phase-contrast objective.
- Phase plate.
- Eyepiece.
- Mechanical stage.
- Focusing mechanism.
Working
- Light is produced by the microscope illumination system.
- The annular diaphragm produces a ring-shaped illumination.
- Light passes through the specimen.
- Different structures cause different phase shifts.
- The phase plate modifies the phase relationship between direct and diffracted light.
- Phase differences are converted into visible intensity differences.
- The objective forms the magnified image.
Applications
- Observation of living cells.
- Study of cell morphology.
- Microbial observation.
- Cell culture monitoring.
- Observation of intracellular structures.
- Study of cellular changes without extensive staining.
Advantages
- Useful for living cells.
- Usually does not require staining.
- Provides improved contrast for transparent specimens.
- Useful for dynamic observations.
Limitations
- Halo and shade-off artifacts may occur.
- Thick specimens can be difficult to interpret.
- Special phase-contrast objectives are required.
2. Electron Microscopy
Electron microscopy uses a beam of electrons rather than visible light to form highly magnified images. Because electrons can have much shorter wavelengths than visible light, electron microscopes can achieve much higher resolving power than conventional light microscopes.
The two major forms relevant to biological investigation are Transmission Electron Microscopy (TEM) and Scanning Electron Microscopy (SEM).
3. Transmission Electron Microscopy (TEM)
Principle
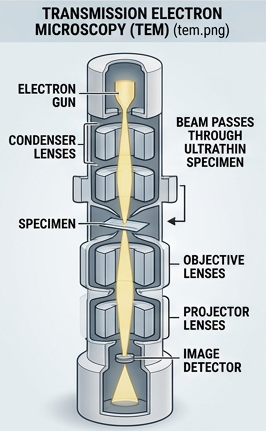
In TEM, electrons pass through an extremely thin specimen. Regions of the specimen differ in their ability to scatter or transmit electrons, producing contrast in the resulting image.
Major components
- Electron gun.
- High-voltage acceleration system.
- Condenser electromagnetic lenses.
- Specimen holder.
- Objective lens.
- Projector lenses.
- Vacuum system.
- Imaging detector or viewing screen.
Working
- Electrons are generated by the electron gun.
- The electrons are accelerated to high energy.
- Electromagnetic lenses focus the electron beam.
- The beam passes through the thin specimen.
- Electrons are scattered differently by different regions.
- The objective and projector lenses magnify the image.
- The final image is detected and recorded.
Sample preparation
- Fixation.
- Dehydration.
- Embedding.
- Ultrathin sectioning when required.
- Contrast enhancement using suitable electron-dense materials.
Applications
- Ultrastructural study of cells.
- Study of organelles.
- Virus morphology.
- Membrane structure.
- Microbial ultrastructure.
- Subcellular localization.
4. Scanning Electron Microscopy (SEM)
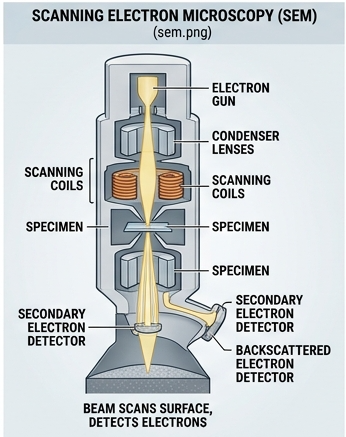
SEM produces images primarily by scanning a focused electron beam across the surface of a specimen and detecting signals generated by electron–sample interactions.
Principle
A focused electron beam scans the specimen surface. Secondary electrons and other signals generated from the surface are collected by detectors and converted into an image.
Major components
- Electron gun.
- Electromagnetic lenses.
- Scanning coils.
- Specimen chamber.
- Detectors.
- Vacuum system.
- Image-processing system.
Applications
- Surface morphology.
- Microbial surface structure.
- Biomaterial analysis.
- Cell-surface studies.
- Three-dimensional-looking surface imaging.
5. TEM vs SEM
| Feature | TEM | SEM |
|---|---|---|
| Main observation | Internal ultrastructure | Surface morphology |
| Electron interaction | Electrons transmitted through specimen | Signals generated from scanned surface |
| Specimen | Very thin sections commonly required | Surface-prepared specimen |
| Image appearance | Primarily two-dimensional projection | Strong surface/topographical appearance |
| Main application | Ultrastructure | Surface morphology |
6. Fluorescence Microscopy
Principle
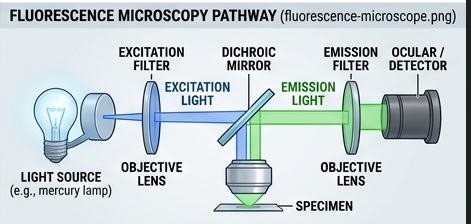
A fluorophore absorbs energy from incident excitation light and becomes excited to a higher energy state. When it returns toward a lower energy state, part of the absorbed energy is released as emitted light of a longer wavelength.
Important components
- Excitation light source.
- Excitation filter.
- Dichroic mirror.
- Objective lens.
- Emission filter.
- Detector or camera.
Fluorophores
Fluorophores are molecules capable of producing fluorescence. They may be attached directly to a biological target or associated with antibodies, nucleic-acid probes or other recognition molecules.
Working
- Excitation light reaches the specimen.
- Fluorophores absorb the excitation energy.
- Fluorophores enter an excited state.
- Fluorescent emission is produced.
- The emission passes through the appropriate optical filter.
- The detector records the fluorescent signal.
Applications
- Detection of specific microorganisms.
- Immunofluorescence.
- Localization of proteins.
- DNA/RNA detection.
- Cellular imaging.
- Diagnosis and research applications.
Advantages
- High specificity when selective fluorescent labels are used.
- Excellent contrast against dark backgrounds.
- Useful for localization of specific molecules.
- Multiple fluorophores can allow multiplex analysis.
Limitations
- Photobleaching.
- Autofluorescence.
- Phototoxicity in some live-cell applications.
- Requires suitable fluorescent labels.
- Specialized optical components are required.
7. Model 10-Mark Answer: Explain Electron Microscopy
Electron microscopy is a high-resolution microscopy technique that uses electrons instead of visible light to produce magnified images. Because the wavelength associated with high-energy electrons can be much shorter than visible light, electron microscopy provides substantially greater resolving capability than conventional light microscopy.
Two important forms of electron microscopy are transmission electron microscopy and scanning electron microscopy.
In TEM, electrons pass through a very thin specimen. Differences in electron scattering produce contrast that allows internal ultrastructure to be visualized. The major components include an electron gun, accelerating system, electromagnetic lenses, specimen chamber, objective lens, projector lenses, vacuum system and imaging detector.
In SEM, a focused electron beam scans the specimen surface. Secondary electrons and other signals produced by interaction of the beam with the specimen are detected and converted into an image. SEM is particularly useful for studying surface morphology and topographical features.
Electron microscopy requires specialized sample preparation and a vacuum environment. Biological specimens commonly require fixation, dehydration and other preparation steps.
TEM is particularly useful for intracellular ultrastructure, organelles and viral morphology, whereas SEM is particularly useful for surface structure and morphology.
Therefore, electron microscopy is an important technique for investigating biological structures beyond the resolving capability of ordinary light microscopy.
Unit 4 — Centrifugation
1. Principle of Centrifugation
When a sample rotates at high speed, particles experience an outward-directed effective force. Particles differ in their tendency to sediment depending on properties such as size, shape, density and the density and viscosity of the surrounding medium.
Larger or denser particles generally sediment more readily than smaller or less dense particles under appropriate centrifugation conditions.
2. Centrifugal Force and Sedimentation
Sedimentation is the movement of suspended particles under an applied field. In centrifugation, the centrifugal field accelerates this process compared with ordinary gravitational settling.
The rate of sedimentation is influenced by particle size, particle density, particle shape, medium density, medium viscosity and the strength of the centrifugal field.
General factors
- Particle mass.
- Particle density.
- Particle shape.
- Medium density.
- Medium viscosity.
- Rotational speed.
- Rotor radius.
- Duration of centrifugation.
3. Relative Centrifugal Force (RCF)
Relative centrifugal force expresses the centrifugal acceleration relative to the acceleration due to gravity. It is more informative than rpm alone because the same rotational speed can produce different centrifugal forces in rotors with different radii.
where r is the rotor radius in centimetres.
Example
Suppose a centrifuge operates at 5,000 rpm and the effective rotor radius is 10 cm.
First calculate the square of rpm:
Therefore:
4. Factors Affecting Sedimentation
Particle size
Larger particles generally sediment more rapidly than smaller particles under comparable conditions.
Particle density
A greater density difference between the particle and surrounding medium can increase sedimentation tendency.
Shape
Compact particles generally move differently from elongated or irregular particles because drag depends on particle shape.
Medium viscosity
Greater viscosity increases resistance to movement and therefore tends to decrease sedimentation rate.
Rotor speed
Increasing rotational speed increases the centrifugal field, although the appropriate speed depends on the sample and objective of the experiment.
Time
Longer centrifugation generally permits more sedimentation, but excessive time can increase unwanted co-sedimentation.
5. Types of Centrifuges
| Type | General Use |
|---|---|
| Clinical centrifuge | Routine separation of biological fluids. |
| Microcentrifuge | Small-volume tubes and molecular biology work. |
| High-speed centrifuge | Faster sedimentation of smaller particles. |
| Ultracentrifuge | Very high centrifugal fields for macromolecules, organelles and large biological particles. |
6. Differential Centrifugation
Differential centrifugation separates particles primarily according to differences in sedimentation rate. A cell homogenate is subjected to sequential centrifugation steps, usually beginning with relatively low centrifugal force and progressing to higher force.
General sequence
Larger structures generally sediment at lower centrifugal forces, whereas smaller structures require stronger centrifugal conditions.
Applications
- Cell fractionation.
- Nuclear isolation.
- Mitochondrial enrichment.
- Membrane fractionation.
- Preparation of subcellular fractions.
7. Density-Gradient Centrifugation
Density-gradient centrifugation separates particles using a gradient of solution density. The gradient reduces mixing and can improve resolution compared with simple differential centrifugation.
Major approaches
- Rate-zonal centrifugation.
- Isopycnic centrifugation.
8. Rate-Zonal Centrifugation
In rate-zonal centrifugation, particles are initially layered over a density gradient and sediment through the gradient at different rates. Separation depends mainly on differences in sedimentation behavior.
The sample must be carefully loaded because excessive sample concentration or inappropriate loading can reduce resolution.
Applications
- Separation of macromolecules.
- Virus particles.
- Subcellular components.
- Ribosomal particles.
9. Isopycnic Centrifugation
Isopycnic centrifugation separates particles according to buoyant density. During centrifugation, particles move until they reach a region of the gradient whose density matches their own buoyant density.
Applications
- DNA separation.
- Subcellular particle separation.
- Virus and macromolecular investigations.
10. Ultracentrifugation
Ultracentrifugation is performed at very high centrifugal fields and is capable of separating particles much smaller than those routinely separated by ordinary centrifuges.
Types of ultracentrifugation approaches
- Preparative ultracentrifugation.
- Analytical ultracentrifugation.
Preparative ultracentrifugation is primarily used to isolate and collect biological fractions. Analytical ultracentrifugation is used to investigate sedimentation behavior and properties of macromolecules.
Applications
- Macromolecular studies.
- Protein complexes.
- Virus purification.
- Subcellular fractionation.
- Study of molecular association.
- Particle characterization.
11. Centrifuge Instrumentation
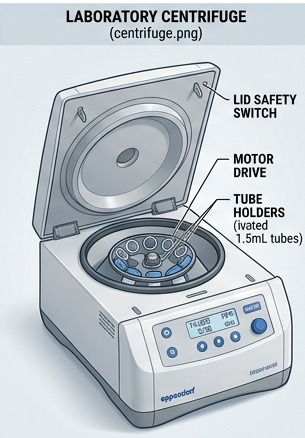
A laboratory centrifuge contains several components that work together to generate controlled centrifugal conditions.
Major components
- Motor — provides rotational energy.
- Rotor — holds and rotates the sample containers.
- Drive system — transfers rotational energy.
- Speed-control system — regulates rotational speed.
- Temperature-control system — important for temperature-sensitive samples.
- Timer — controls centrifugation duration.
- Safety-lock system — prevents opening while the rotor is moving.
- Display/control panel — allows selection and monitoring of conditions.
12. Centrifuge Rotors
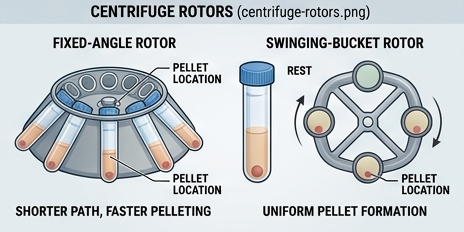
The rotor is one of the most important components of a centrifuge. Rotor design influences sample movement, achievable centrifugal force and the type of separation that can be performed.
Fixed-angle rotor
Tubes are held at a fixed angle relative to the rotational axis. These rotors are commonly used for pelleting particles.
Swinging-bucket rotor
Buckets move outward toward a more horizontal orientation during rotation. They are particularly useful for density gradients and applications where distinct horizontal layers are desired.
13. Centrifugation Safety
Centrifugation involves rapidly rotating components and therefore requires strict laboratory safety.
- Inspect tubes before use.
- Use compatible tubes and rotors.
- Balance opposing tubes appropriately.
- Never exceed the rated rotor speed.
- Ensure the rotor is correctly installed.
- Close the centrifuge lid securely.
- Never attempt to open a centrifuge while the rotor is moving.
- Inspect rotors for corrosion or damage.
- Follow the manufacturer's operating instructions.
14. Applications of Centrifugation in Biological Research
- Separation of blood components.
- Cell fractionation.
- Isolation of nuclei.
- Mitochondrial preparation.
- Membrane fractionation.
- Protein purification.
- DNA and RNA preparation.
- Virus purification.
- Separation of macromolecular complexes.
- Preparation of cell-free extracts.
- Analysis of particle sedimentation.
15. Comparison of Major Centrifugation Methods
| Method | Main Basis | Major Application |
|---|---|---|
| Differential centrifugation | Different sedimentation rates | Cell and organelle fractionation |
| Rate-zonal centrifugation | Sedimentation rate through gradient | Macromolecules and particles |
| Isopycnic centrifugation | Buoyant density | DNA and particle separation |
| Ultracentrifugation | Very high centrifugal field | Macromolecules, viruses and subcellular components |
16. Model 10-Mark Answer: Explain Centrifugation and Its Types
Centrifugation is an important separation technique used in biological and biochemical laboratories. It separates particles suspended in a liquid by applying centrifugal force. The sedimentation behavior of a particle depends on its size, density, shape and the physical properties of the surrounding medium.
When a sample is rotated at high speed, particles experience a centrifugal field. Larger or denser particles generally sediment more rapidly than smaller or less dense particles under appropriate conditions.
Differential centrifugation is commonly used for cell fractionation. A homogenized sample is centrifuged sequentially at increasing centrifugal forces. Larger structures sediment first, followed by progressively smaller structures.
Density-gradient centrifugation uses a gradient in solution density. In rate-zonal centrifugation, particles move through the gradient at different rates. In isopycnic centrifugation, particles migrate until they reach a position where the density of the surrounding medium corresponds to their buoyant density.
Ultracentrifugation uses very high centrifugal fields and is useful for separating and studying macromolecules, viruses, organelles and large biological complexes.
Major centrifuge components include the motor, rotor, speed-control system, timer, temperature-control system and safety-lock mechanism. Proper rotor selection, balancing and adherence to speed limits are essential for safe operation.
Centrifugation has extensive applications in blood separation, cell fractionation, protein purification, nucleic-acid preparation, virus purification and subcellular biology. Therefore, it is one of the most fundamental separation techniques in biological research.
Important Examination Questions — Section 1
Important 10-Mark Questions
- Define buffer. Explain buffering action and discuss the importance of buffers in biological research.
- Derive/explain the Henderson–Hasselbalch equation and discuss its biological applications.
- Describe the preparation and properties of biological buffers.
- Explain the general principles and approaches used in biochemical investigations.
- Explain different methods of cell disruption with their principles, advantages and limitations.
- Describe chemical methods of cell disruption.
- Explain enzymatic and mechanical methods of cell disruption.
- Describe protein extraction and solubilization.
- Discuss the factors affecting protein solubility.
- Explain phase-contrast microscopy with principle, instrumentation and applications.
- Describe transmission electron microscopy with a suitable labelled diagram.
- Describe scanning electron microscopy and explain its applications.
- Compare TEM and SEM.
- Explain fluorescence microscopy with principle, instrumentation, working and applications.
- Explain the principle and instrumentation of centrifugation.
- Describe differential centrifugation.
- Explain density-gradient centrifugation.
- Differentiate rate-zonal and isopycnic centrifugation.
- Explain ultracentrifugation and its applications.
- Discuss the applications of centrifugation in biological research.
Important 5-Mark Questions
- Define buffer and explain buffering action.
- Write a note on physiological solutions.
- Explain buffer capacity.
- Write the Henderson–Hasselbalch equation.
- Write a note on phosphate buffer.
- Write a note on bicarbonate buffer.
- Write a note on Tris buffer.
- Explain extraction buffers.
- Describe osmotic cell lysis.
- Explain sonication.
- Write a note on French press.
- Explain bead beating.
- Write a note on enzymatic digestion.
- Explain protein solubilization.
- Explain phase-contrast microscopy.
- Write a note on TEM.
- Write a note on SEM.
- Explain fluorescence microscopy.
- Define RCF.
- Explain differential centrifugation.
- Explain density-gradient centrifugation.
- Differentiate rate-zonal and isopycnic centrifugation.
- Write a note on ultracentrifugation.
- Write a note on centrifuge rotors.
Important 2-Mark Questions
- Define buffer.
- What is pKa?
- What is buffer capacity?
- Write the Henderson–Hasselbalch equation.
- What is a physiological solution?
- Name two biological buffers.
- What is cell disruption?
- What is sonication?
- What is an extraction buffer?
- What is protein solubilization?
- What is phase contrast?
- What is a fluorophore?
- What is TEM?
- What is SEM?
- Define centrifugation.
- What is RCF?
- What is differential centrifugation?
- What is density-gradient centrifugation?
- What is isopycnic centrifugation?
- What is ultracentrifugation?
Viva Voce Questions
- Why are buffers important in biochemical experiments?
- What is the difference between a buffer and an ordinary salt solution?
- What happens when the pH approaches the pKa of a buffer?
- Why is pH important for proteins?
- What is cell disruption?
- Why is low temperature often maintained during protein extraction?
- What is the purpose of protease inhibitors?
- Why are detergents used in protein extraction?
- What is sonication?
- What is the main difference between chemical and mechanical cell disruption?
- What is phase-contrast microscopy used for?
- Why is staining often unnecessary in phase-contrast microscopy?
- What is the basic principle of TEM?
- What is the major difference between TEM and SEM?
- Why does electron microscopy require a vacuum system?
- What is a fluorophore?
- What is fluorescence?
- What is centrifugation?
- Why is balancing necessary in centrifugation?
- What is the difference between rpm and RCF?
- What is differential centrifugation?
- What is a density gradient?
- What is rate-zonal centrifugation?
- What is isopycnic centrifugation?
- Why is ultracentrifugation used?
Section 1 — Quick Revision Table
| Topic | Core Point to Remember |
|---|---|
| Buffer | Resists large changes in pH after small additions of acid or base. |
| Henderson–Hasselbalch equation | Relates pH, pKa and conjugate-base/weak-acid ratio. |
| Buffer capacity | Ability of a buffer to resist pH change. |
| Cell disruption | Releases intracellular components. |
| Extraction buffer | Maintains appropriate chemical conditions during extraction. |
| Protein solubilization | Keeps protein dispersed in solution. |
| Phase-contrast microscopy | Converts phase differences into intensity differences. |
| TEM | Primarily used for internal ultrastructure. |
| SEM | Primarily used for surface morphology. |
| Fluorescence microscopy | Detects emitted fluorescent light from labelled targets. |
| Centrifugation | Separates particles according to sedimentation behavior. |
| RCF | Relative centrifugal force expressed relative to gravity. |
| Differential centrifugation | Sequential separation based mainly on sedimentation rate. |
| Rate-zonal centrifugation | Separation through a density gradient based largely on sedimentation rate. |
| Isopycnic centrifugation | Separation according to buoyant density. |
| Ultracentrifugation | Uses very high centrifugal fields for small particles and macromolecular investigations. |
Section 1 Completed
Section 1 provides the foundation for the remaining Bioinstrumentation course. The next section will focus extensively on electrophoretic and chromatographic separation techniques.
↑ Back to Top